zqy
8ff0c5a445
zz
zqy
8ff0c5a445
zz
|
3 years ago | |
|---|---|---|
| .. | ||
| resource | 3 years ago | |
| README.md | 3 years ago | |
README.md
智能猫眼3518简介
一 概述
本Demo是基于Hi3518开发板,使用开源OpenHarmony开发的RTSP协议流媒体应用。达到将Hi3518开发板中摄像头获取的数据通过RTSP协议传输到手机并显示 。
rtsp实现可参考文档:RTSPServer
1.1应用运行效果图

1.2 设备与手机间交互示意图
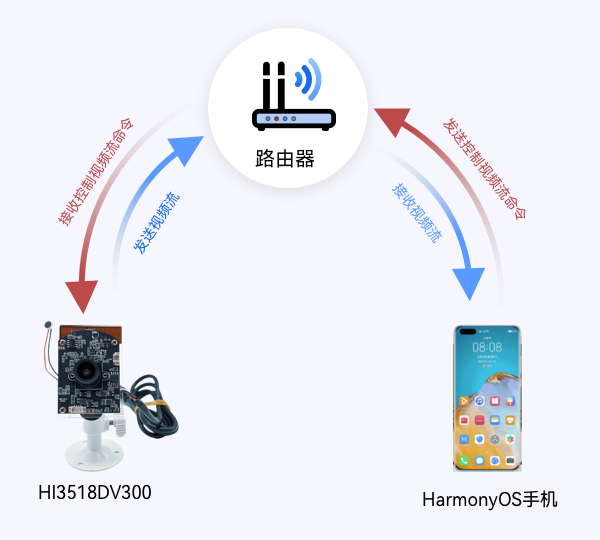
如上图所示,手机播放3518摄像头采集的视频数据。
二 快速上手
2.1硬件开发环境准备
预装windows系统的PC机
Hi3518EV300 IoT Camera开发板
USB转串口线、网线(Windows工作台通过USB转串口线、网线与开发板连接)
开发板介绍参照文档:Hi3518开发板介绍
淘宝店Hi3518EV300开发板购买地址:HarmonyOS HiSpark Aries IPC 摄像头(Hi3518E)开发板套件
2.2下载源码
准备
注册码云gitee账号。
注册码云SSH公钥,请参考码云帮助中心的公钥管理:https://gitee.com/help/articles/4181
安装下载工具
sudo apt-get install git-lfs
sudo apt-get install curl
sudo update-alternatives --install /usr/bin/python python /usr/bin/python3.8 1
安装git客户端并配置用户信息。
git config --global user.name "yourname"
git config --global user.email "your-email-address"
git config --global credential.helper store
安装码云repo工具,可以执行如下命令。
curl https://gitee.com/oschina/repo/raw/fork_flow/repo-py3 > /usr/local/bin/repo
chmod a+x /usr/local/bin/repo
pip install -i https://pypi.tuna.tsinghua.edu.cn/simple requests
下载OpenHarmony源码
#特别注意:请下载OpenHarmony 1.0.1 版本,后续会更新支持OpenHarmony其他版本
repo init -u git@gitee.com:openharmony/manifest.git -b OpenHarmony_1.0.1_release --no-repo-verify
repo sync -c
repo forall -c 'git lfs pull'
下载smart_door_viewer_3518代码
具体仓库地址: knowledge_demo_smart_home
通过git命令下载(方便后期代码上传管理,建议先将仓库fork到自己账号目录,然后再下载):
git clone git@gitee.com:xxxxxxx/knowledge_demo_smart_home.git
其中xxxxxxx为fork后相关账号名字。
代码拷贝
在OpenHarmony的vendor目录下新建一个team_x的目录:
mkdir vendor/team_x将下载的智能油烟机代码的代码拷贝到新建的team_x下面:
cp -rf ../knowledge_demo_smart_home/dev/team_x/smart_door_viewer_3518/ vendor/team_x/
3.将
knowledge_demo_smart_home/dev/team_x/smart_door_viewer_3518/openHarmony1.0.1
目录下中的文件替换到openHarmony1.0.1源码下对应的文件
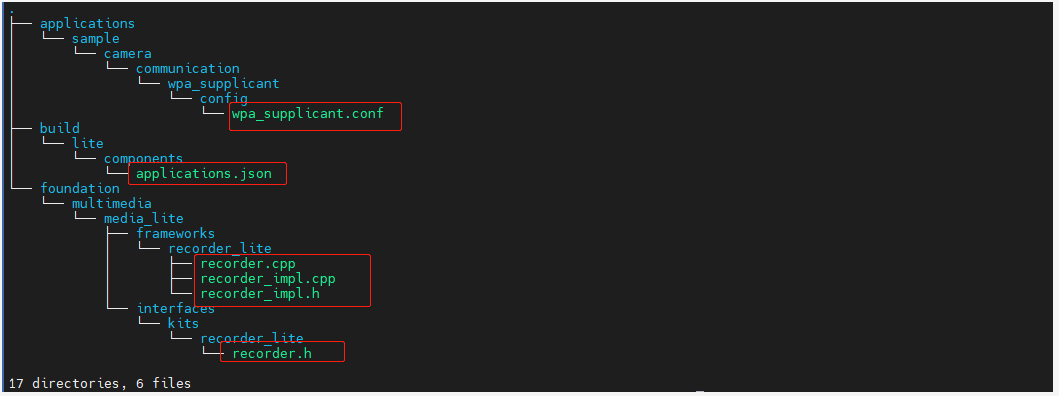
代码目录结构
├── smart_door_viewer_3518
│   ├── BUILD.gn										// 编译脚本
│   ├── include
│   │   ├── camera_sample.h								// 摄像头定义头文件
│   │   ├── rtp.h                                       // rtp协议传输头文件
│   │   ├── rtsp_log.h                                  // 打印调试头文件
│   │   └── rtsp_server.h                               // rtsp_server头文件
│   └── src
│       ├── camera_sample.cpp                           // 摄像头实现
│       ├── main.cpp                                    // 主函数
│       ├── rtp.cpp                                     // rtp协议实现
│       └── rtsp_server.cpp                             // rtsp协议实现
├── foundation
│   └── multimedia
│       └── media_lite
│           ├── frameworks
│           │   └── recorder_lite
│           │       ├── recorder.cpp                    //增加获取h.265数据存放至环形缓冲区接口实现
│           │       ├── recorder_impl.cpp               //增加向应用层提供环形缓冲区接口实现
│           │       └── recorder_impl.h                 //增加向应用层提供环形缓冲区接口定义
│           └── interfaces
│               └── kits
│                   └── recorder_lite
│                       └── recorder.h                  //增加获取h.265数据存放至环形缓冲区接口定义
2.3Linux编译服务器开发环境准备
开发基础环境由windows 工作台和Linux 编译服务器组成。windows 工作台通过samba 服务或ssh 方式访问Linux编译服务器。其中windows 工作台用来烧录和代码编辑,Linux编译服务器用来编译OpenHarmony代码,为了简化步骤,Linux编译服务器推荐安装Ubuntu20.04。
参考官方文档搭建开发Linux编译环境。
1) 系统基础环境搭建。 2) Hi3518搭建环境
编译
源码和环境准备完后,接下来就是编译,编译涉及的指令有2条,hb set和hb build -f 。
hb set -- 设置工程目录和选择对应的目标,通过键盘的上下键来选择。

hb build -f -- 开始全量编译。(hb build 为增量编译)
编译完后会生成对应整个系统固件(u-boot-hi3518ev300.bin,OHOS_Image.bin, rootfs_vfat.img, userfs_vfat.img)
以下表格为所有生成的固件及对应的位置:
| 生产固件及应用文件的名称 | 对应文件路径 | 文件说明 |
|---|---|---|
| u-boot-hi3518ev300.bin | device/hisilicon/hispark_aries/sdk_liteos/uboot/out/boot | 系统启动引导程序 |
| OHOS_Image.bin | out/hispark_aries/smart_door_viewer_3518/ | 系统内核固件 |
| rootfs_vfat.img | out/hispark_aries/smart_door_viewer_3518/ | 文件系统 |
| userfs_vfat.img | out/hispark_aries/smart_door_viewer_3518/ | 用户数据 |
2.4固件烧录
烧录工具选择
固件编译完后,是需要烧录到单板的。这里我们用的是HiTool工具烧录的。(HiTool工具下载地址:HiHope官网)
烧录步骤
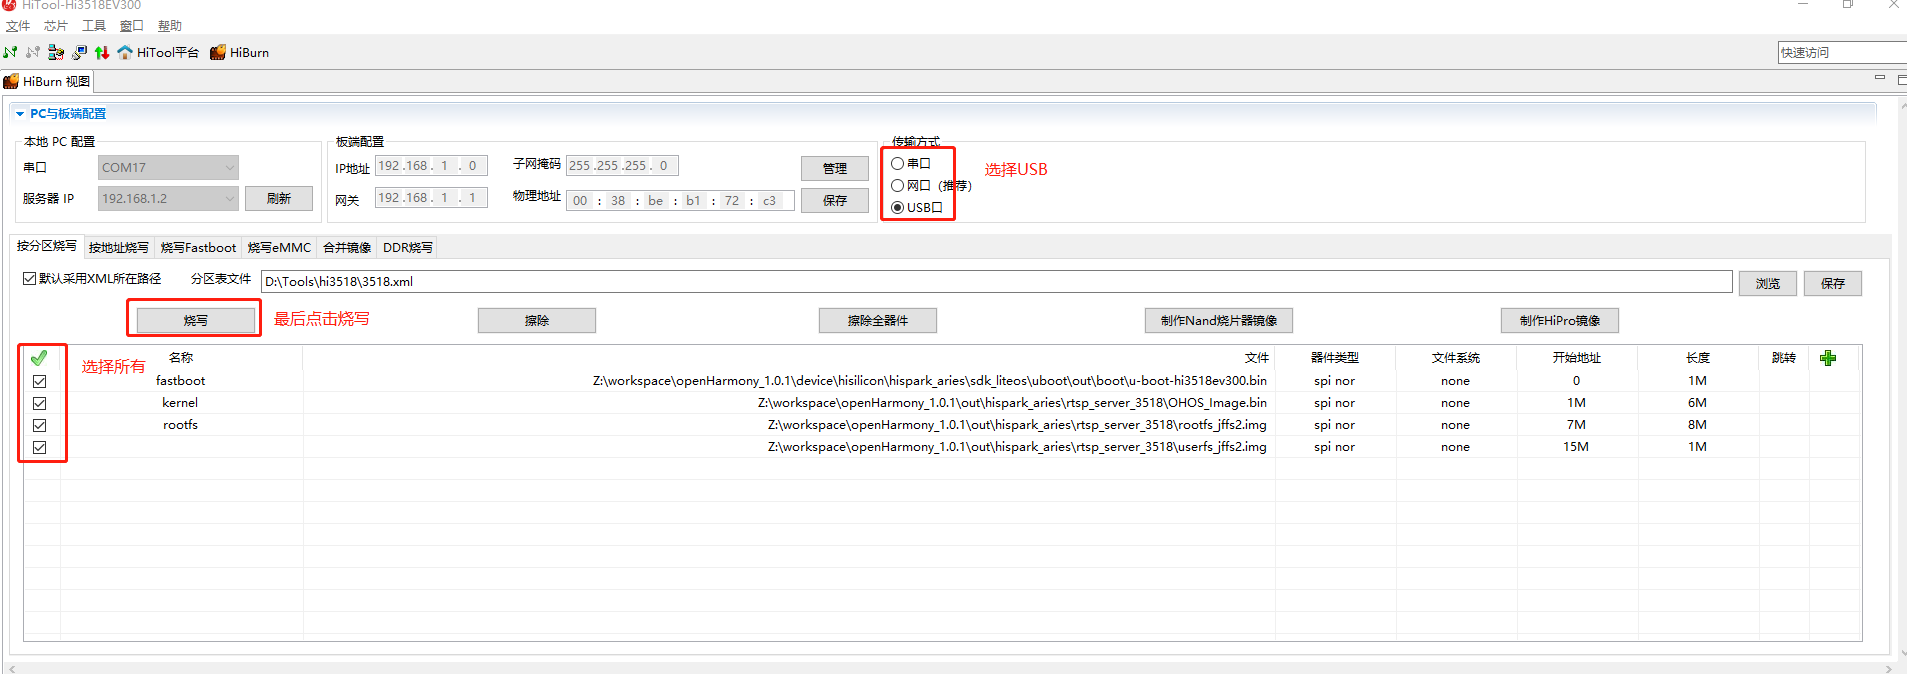
打开HiTool工具,如下图:
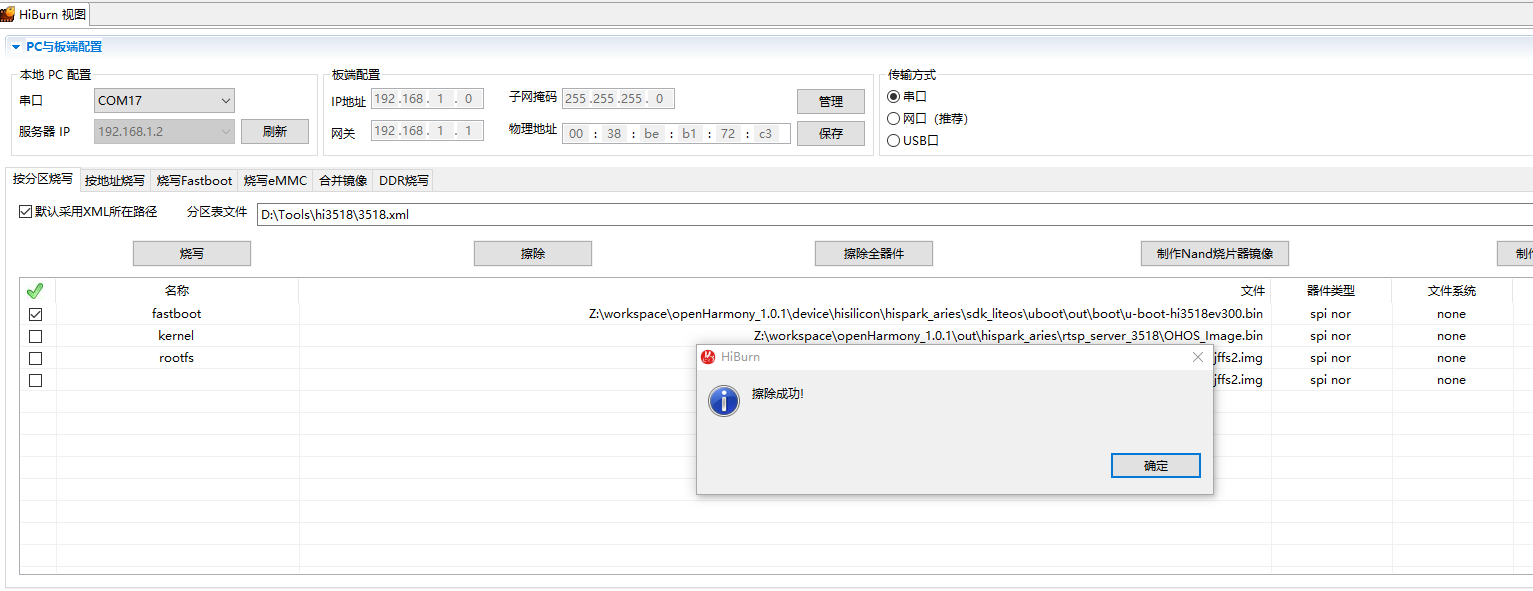
烧写步骤按照图中标注即可。点击擦除后再拔出USB口再接入。
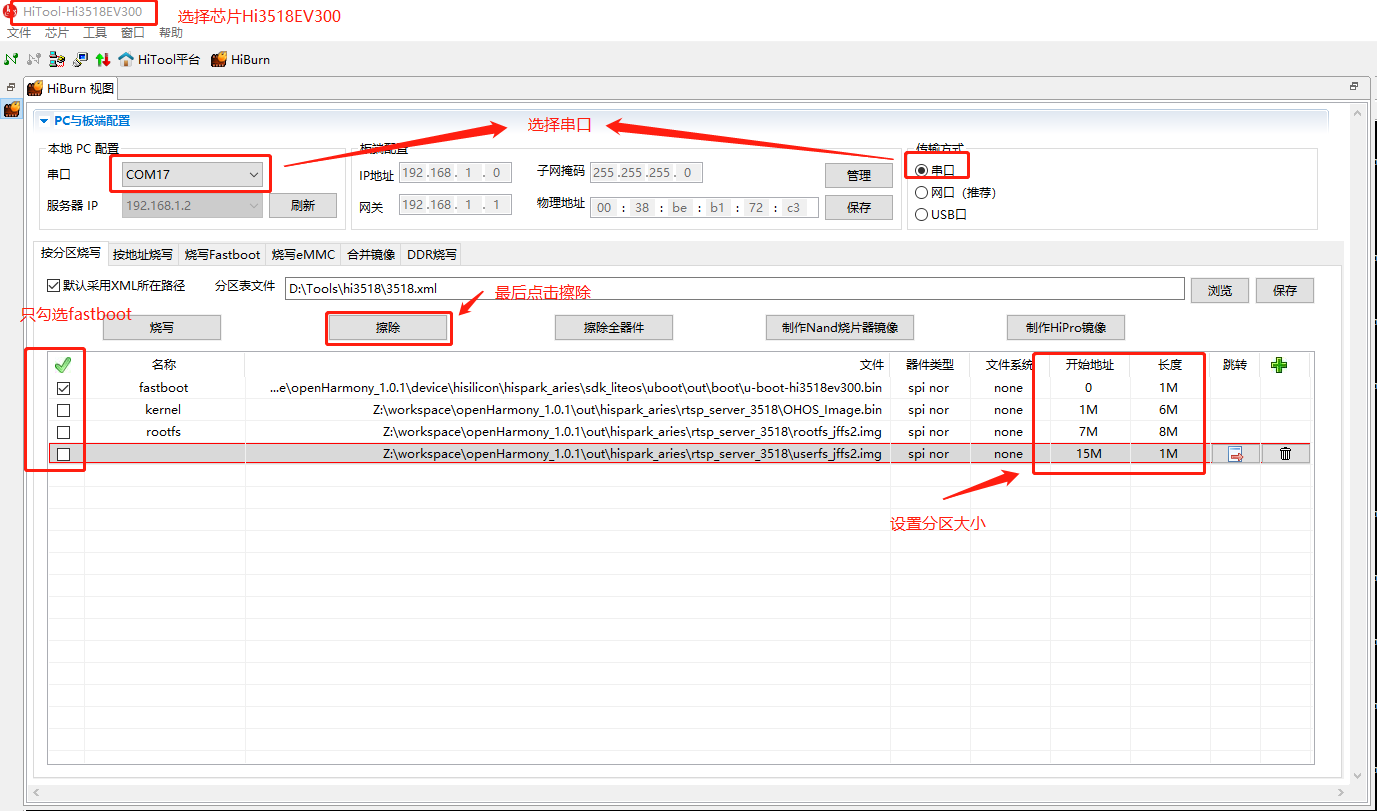
擦除成功如下所示。
然后按如下图选择,再点击烧写。
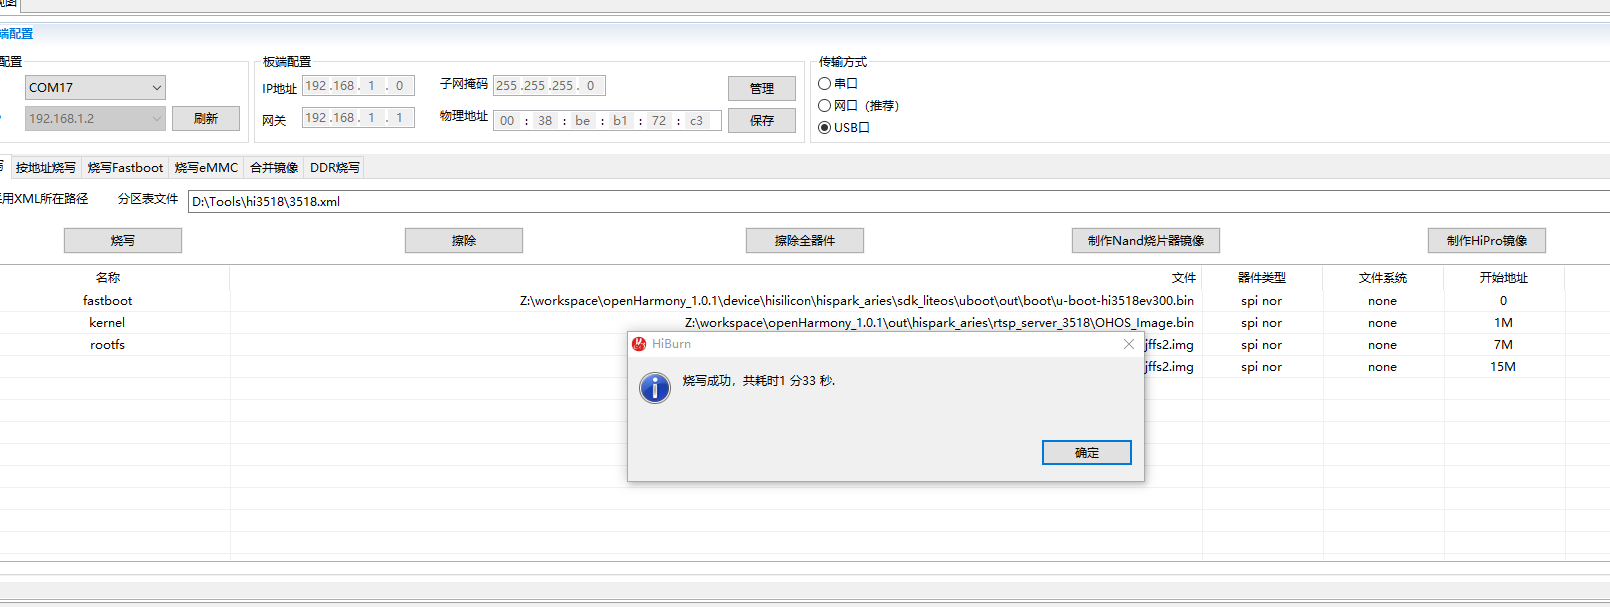
烧录成功后,会弹出如下提示,单板也会自行启动。
单板在启动的时候需要设置bootargs,否则不能正常启动。单板第一次启动会停在hisilicon界面:
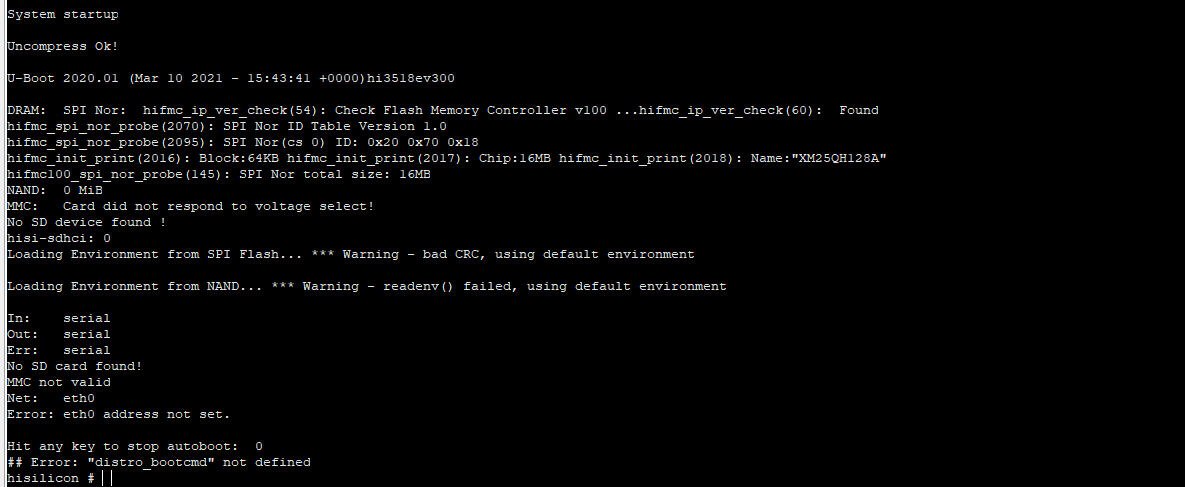
输入以下启动参数:
setenv bootcmd "sf probe 0;sf read 0x40000000 0x100000 0x600000;go 0x40000000";
setenv bootargs "console=ttyAMA0,115200n8 root=flash fstype=jffs2 rw rootaddr=7M rootsize=8M";
save;
reset
三启动rtsp_server应用
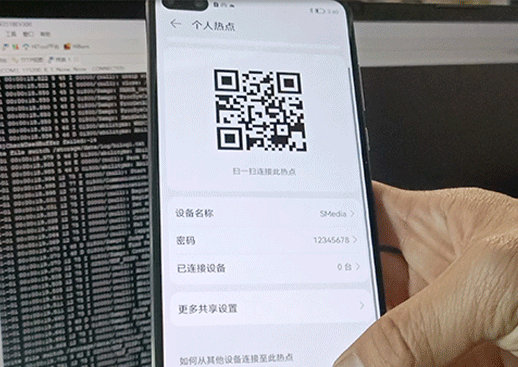
开启热点
准备一部手机开启热点设置
ssid为"SMedia",
password为”12345678“。
设备连接热点
1、准备一张SD卡插入到插槽内。
2、进入3518的shell输入如下命令连接热点:
./bin/wpa_supplicant -iwlan0 -c/etc/wpa_supplicant.conf

3、在3518中输入ifconfig查看连接状态:

运行应用
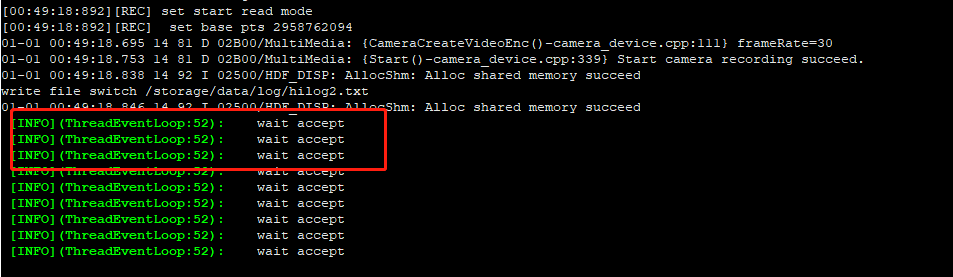
1、在串口下输入
./bin/rtsp_server

打印如下表示设备应用已准备完毕
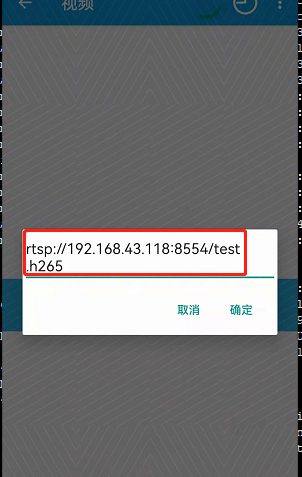
4、在手机应用市场中搜索”完美播放器“并下载安装。

5、打开菜单选择网址播放。

6、输入rtsp播放地址,其中ip地址192.168.43.118为3518板子中的地址。
效果动图