zqy
8ff0c5a445
zz
zqy
8ff0c5a445
zz
|
3 years ago | |
|---|---|---|
| .. | ||
| resource | 3 years ago | |
| README.md | 3 years ago | |
README.md
智能门铃
一、 介绍
智能门铃通过监控来访者信息,告诉主人门外是否有人按铃、有陌生人靠近或者无人状态。主人可以在数字管家中远程接收消息,并根据需要进行远程取消报警和一键开锁。同时,也可以通过室内屏幕获取门外状态。室内屏幕显示界面使用DevEco Studio 编写的js应用,具有很好的兼容和移植特性。硬件上采用了带有HDF框架的驱动模型,通过GPIO来获取传感器采集信息并驱动报警器进行动作。
1. 交互流程
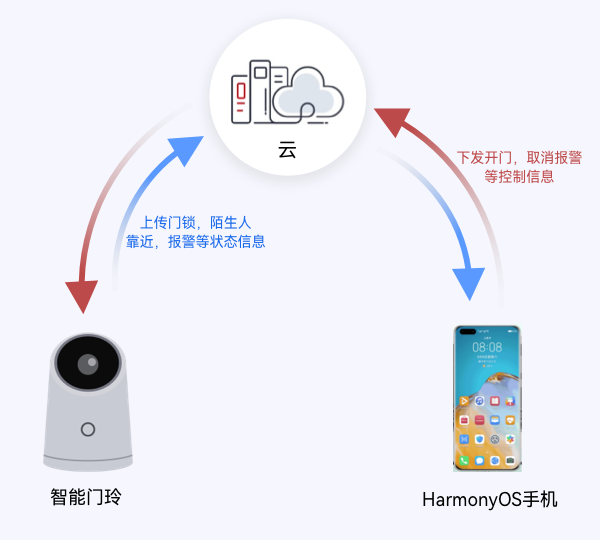
如上图所示,智能门铃整体方案原理图可以大致分成:智能门铃设备、数字管家应用、云平台三部分。智能门铃通过MQTT协议连接华为IOT物联网平台,从而实现命令的接收和属性上报。 关于智能设备接入华为云IoT平台的细节可以参考 连接IOT云平台指南;智能设备同数字管家应用之间的设备模型定义可以参考profile 。
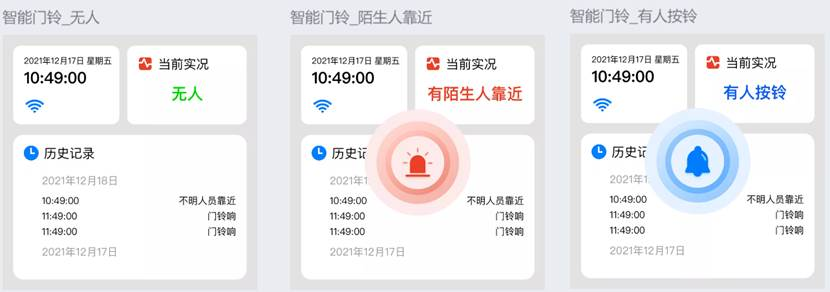
2.实物简介
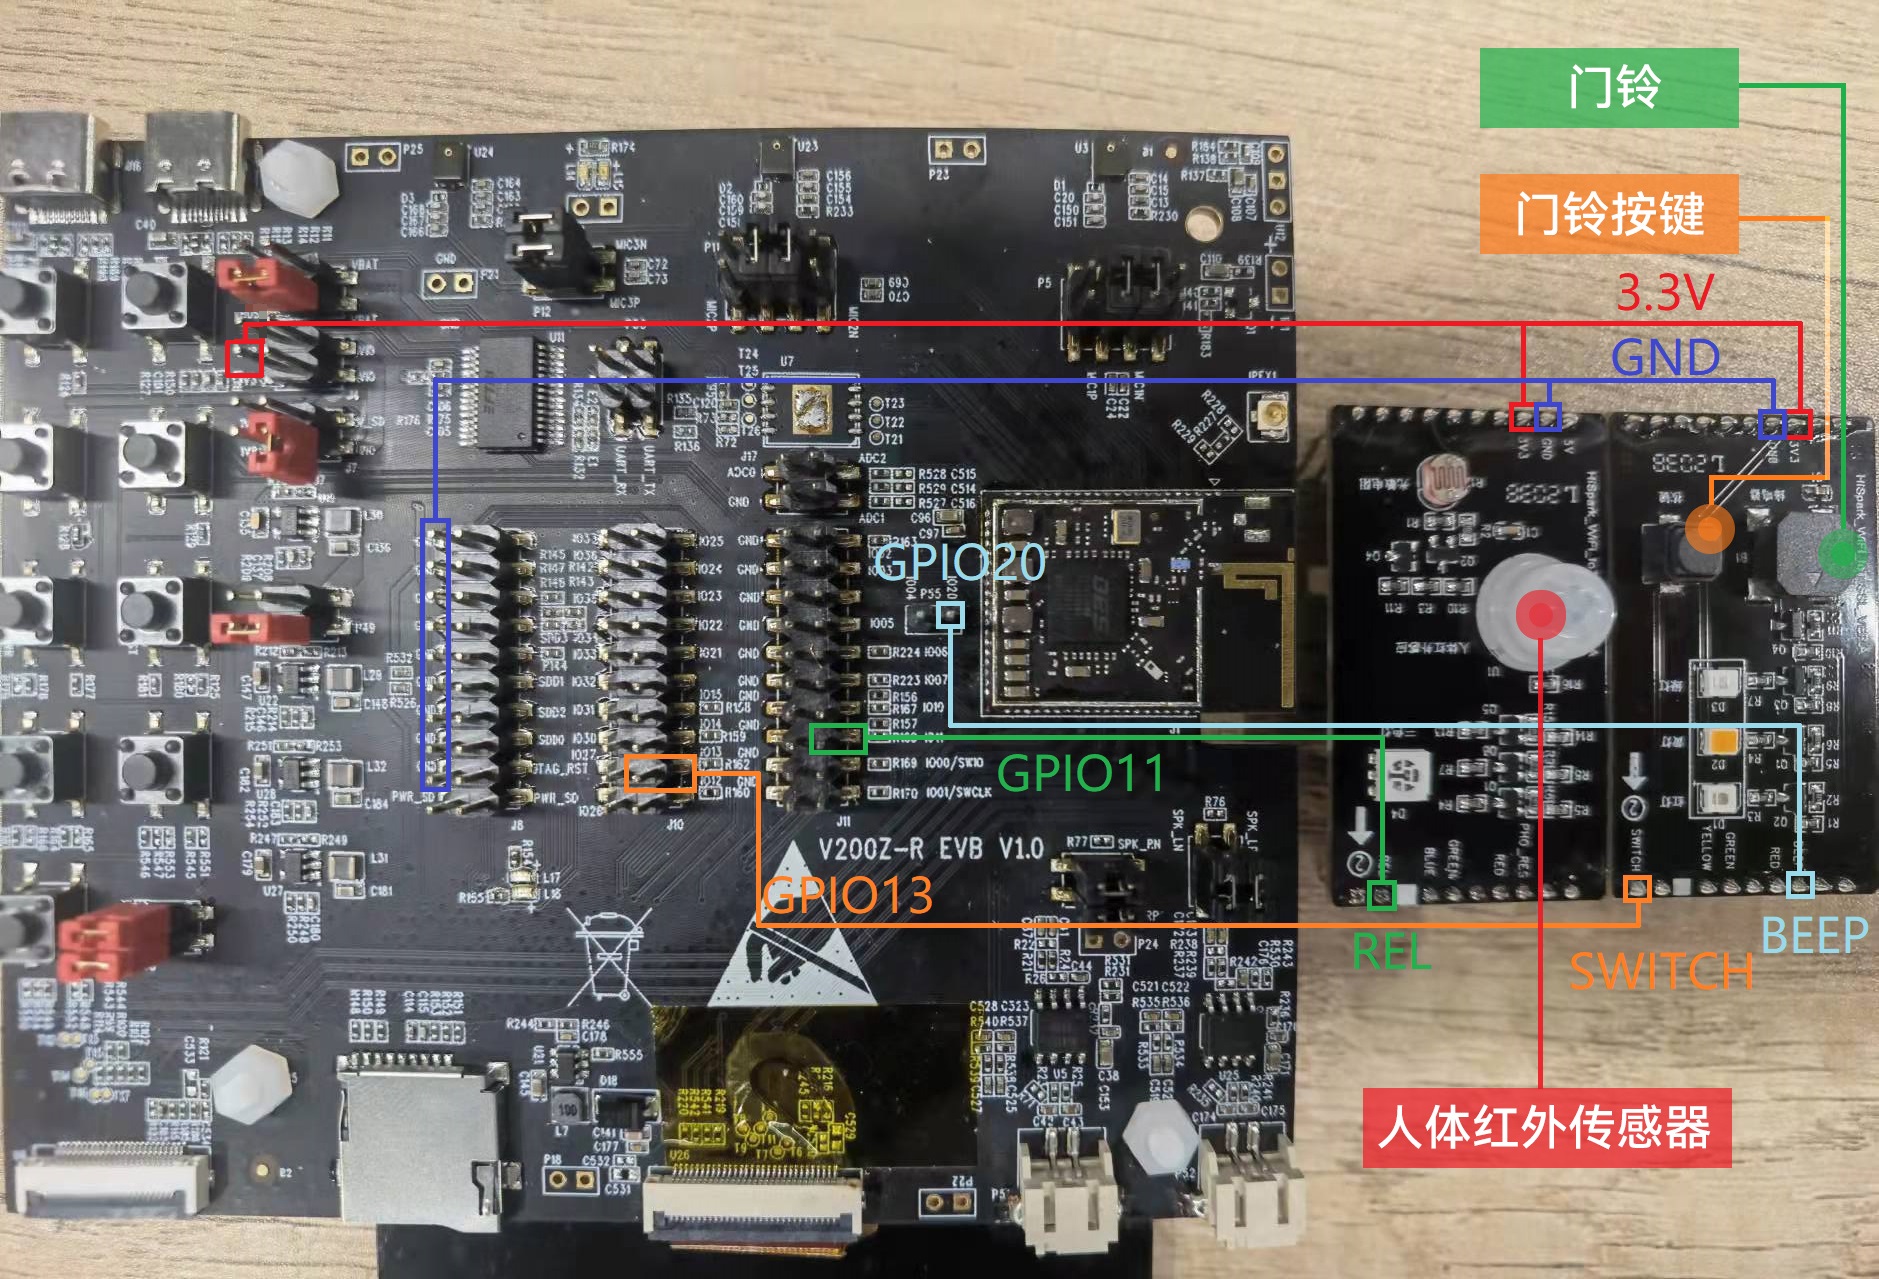
如上图,我们使用欧智通V200Z-R模组来模拟智能门铃设备。 无人靠近的时候,该智能门铃当前情况页面默认显示”无人“状态。 当门铃按钮被按下的时候,开发板的显示屏界面显示“有人按门铃”的提示,伴随蜂鸣器报警,并将实时状态上报至云平台。 当有人靠近且超过一定时间却没按下门铃按钮的时候,开发板的显示屏界面显示”有陌生人靠近“的提示,伴随蜂鸣器报警,并将实时状态上报至云平台。
3.实物操作体验
有陌生人靠近:
有人按门铃:
远程一键开门:
二、快速上手
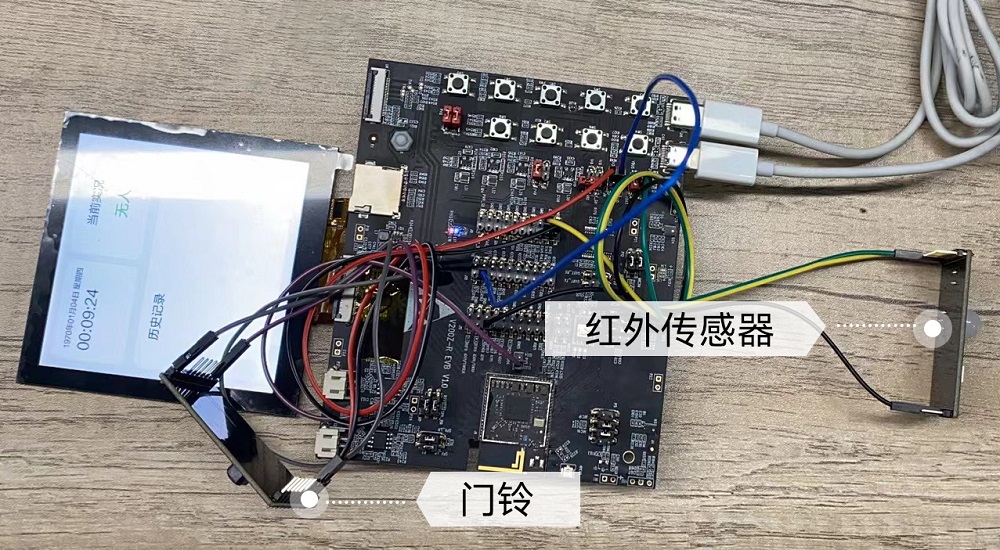
1、硬件准备
欧智通V200Z-R开发板
润和智能家居套件-红绿灯板
润和智能家居套件-炫彩灯板
预装HarmonyOS手机一台
硬件连线图:
2、Linux编译服务器基础环境准备
开发基础环境由 windows 工作台和 Linux 编译服务器组成。windows 工作台可以通过 samba 服务或 ssh 方式访问 Linux编译服务器。其中 windows 工作台用来烧录和代码编辑,Linux 编译服务器用来编译 OpenHarmony 代码,为了简化步骤,Linux 编译服务器推荐安装 Ubuntu20.04。
安装编译依赖基础软件
sudo apt-get install -y build-essential gcc g++ make zlib* libffi-dev git git-lfs
安装和配置Python
打开Linux终端。
输入如下命令,查看python版本号,需要使用python3.7以上版本,否则参考 系统基础环境搭建。
python3 --version安装并升级Python包管理工具(pip3)。
sudo apt-get install python3-setuptools python3-pip -y
sudo pip3 install --upgrade pip
设置pip的国内镜像
pip3 install -i https://pypi.tuna.tsinghua.edu.cn/simple requests
安装hb
输入如下命令确认hb是否为version 0.4.4
hb -v
a. 若提示如下内容,则表示未安装可以从第2步开始操作。
bash: /home/***/.local/bin/hb: No such file or directory
b.若提示如下内容,需要先卸载该版本,然后再执行第2步操作步骤。
[OHOS INFO] hb version 0.4.3
卸载命令:
pip3 uninstall ohos-build
运行如下命令安装hb
pip3 install build/lite // 该命令需在OpenHarmony源码根目录下执行设置环境变量
vim ~/.bashrc将以下命令拷贝到.bashrc文件的最后一行,保存并退出。
export PATH=~/.local/bin:$PATH执行如下命令更新环境变量。
source ~/.bashrc再次执行”hb -v“,有以下版本显示则表示安装的hb版本正确。
[OHOS INFO] hb version 0.4.4
3、V200Z-R开发环境准备
在Linux编译服务器上搭建好基础开发环境后,需要安装OpenHarmony 编译V200Z-R平台特有的开发环境。
安装arm-none-eabi-gcc
打开Linux终端。
下载arm-none-eabi-gcc编译工具。
解压 gcc-arm-none-eabi-10.3-2021.10-x86_64-linux.tar.bz2 安装包至~/toolchain/路径下。
   mkdir -p ~/toolchain/
   tar -jxvf gcc-arm-none-eabi-10.3-2021.10-x86_64-linux.tar.bz2 -C ~/toolchain/
设置环境变量。
vim ~/.bashrc
将以下命令拷贝到.bashrc文件的最后一行,保存并退出。
export PATH=~/toolchain/gcc-arm-none-eabi-10.3-2021.10/bin:$PATH
生效环境变量。
source ~/.bashrc
在命令行中输入如下命令,如果能正确显示编译器版本号,表明编译器安装成功。
arm-none-eabi-gcc -v
4、源码下载&编译准备
1.码云工具下载
1)下载repo工具
mkdir ~/bin
curl https://gitee.com/oschina/repo/raw/fork_flow/repo-py3 > ~/bin/repo
chmod a+x ~/bin/repo

2)设置环境变量并生效
vim ~/.bashrc
export PATH=~/bin:$PATH
source ~/.bashrc
2.代码下载
1) OpenHarmony代码下载
#特别注意:请下载OpenHarmony 3.1 Beta版本
mkdir ~/OpenHarmony_3.1_Beta
cd ~/OpenHarmony_3.1_Beta
repo init -u git@gitee.com:openharmony/manifest.git -b refs/tags/OpenHarmony-v3.1-Beta --no-repo-verify
repo sync -c
repo forall -c 'git lfs pull'
注意:
1.权限问题请参考生成/添加SSH公钥。
2.若在已安装python3.8后,执行repo init 时,仍显示如下错误:
/usr/bin/env: ‘python’: No such file or directory
执行如下命令后,进行重试:
sudo ln -s /usr/bin/python3.8 /usr/bin/python
2) 设备侧代码下载
使用git 命令下载
git clone git@gitee.com:openharmony-sig/knowledge_demo_smart_home.git --depth=1
3) 编译前准备
- ###### 代码拷贝
team_x源码拷贝
   mkdir ~/OpenHarmony_3.1_Beta/vendor/team_x
   cp -rfa ~/knowledge_demo_smart_home/dev/team_x/smart_door_bell ~/OpenHarmony_3.1_Beta/vendor/team_x
common库拷贝
cp -rfa ~/knowledge_demo_smart_home/dev/team_x/common ~/OpenHarmony_3.1_Beta/vendor/team_x
iot_link库拷贝
cp -rfa ~/knowledge_demo_smart_home/dev/third_party/iot_link ~/OpenHarmony_3.1_Beta/third_party/
- ###### kernel/liteos_m 修改
步骤1、下载patch 地址
点击上述链接进入浏览器,将该网页中内容全部复制。
本地创建一个名为bes_kernle.patch文件,并将已经复制的内容粘贴到该文件中。
步骤2、 打上步骤1中的patch
   cd ~/OpenHarmony_3.1_Beta/kernel/liteos_m
   patch -p1 < bes_kernle.patch
- ###### device/soc/bestechnic 修改
步骤1、下载patch 地址
点击上述链接进入浏览器,将该网页中内容全部复制。
本地创建一个名为bes_device.patch文件,并将已经复制的内容粘贴到该文件中。
步骤2、 打上步骤1中的patch
   cd ~/OpenHarmony_3.1_Beta/device/soc/bestechnic
   patch -p1 < bes_device.patch
- ###### third_party/mbedtls 修改
参考如下代码段修改 mbedtls/library/platform.c
   diff --git a/library/platform.c b/library/platform.c
   index c4c3fd3..214173b 100755
   --- a/library/platform.c
   +++ b/library/platform.c
   @@ -86,9 +86,24 @@ static void platform_free_uninit( void *ptr )
    static void * (*mbedtls_calloc_func)( size_t, size_t ) = MBEDTLS_PLATFORM_STD_CALLOC;
    static void (*mbedtls_free_func)( void * ) = MBEDTLS_PLATFORM_STD_FREE;

   +#include "los_memory.h"
   +
    void * mbedtls_calloc( size_t nmemb, size_t size )
    {
   -    return (*mbedtls_calloc_func)( nmemb, size );
   +    //return (*mbedtls_calloc_func)( nmemb, size );
   +    size_t real_size;
   +    void *ptr = NULL;
   +
   +    if (nmemb == 0 || size == 0) {
   +        return NULL;
   +    }
   +
   +    real_size = (size_t)(nmemb * size);
   +    ptr = LOS_MemAlloc(OS_SYS_MEM_ADDR, real_size);
   +    if (ptr != NULL) {
   +        (void)memset_s(ptr, real_size, 0, real_size);
   +    }
   +    return ptr;
    }
- ###### third_party/lwip 修改
修改src/api/netdb.c 文件
   diff --git a/src/api/netdb.c b/src/api/netdb.c
   index 52a6fdf..2043636 100644
   --- a/src/api/netdb.c
   +++ b/src/api/netdb.c
   @@ -100,7 +100,7 @@ lwip_gethostbyname(const char *name)
      err = netconn_gethostbyname(name, &addr);
      if (err != ERR_OK) {
        LWIP_DEBUGF(DNS_DEBUG, ("lwip_gethostbyname(%s) failed,   err=%d\n", name, err));
   -    h_errno = HOST_NOT_FOUND;
   +    //h_errno = HOST_NOT_FOUND;
        return NULL;
      }
- ###### third_party/iot_link 修改
参考如下代码段修改 third_party/iot_link/network/dtls/BUILD.gn
   diff --git a/third_party/iot_link/network/dtls/BUILD.gn b/third_party/iot_link/network/dtls/BUILD.gn
   index 035805d709075ef2bc9d9388e73edb84dc1ee943..ac7256cf2bc93a0a998388f31910f152bf306fa9 100755
   --- a/third_party/iot_link/network/dtls/BUILD.gn
   +++ b/third_party/iot_link/network/dtls/BUILD.gn
   @@ -41,7 +41,8 @@ dtls_cflags = [
        "-Wno-unused-parameter",
    ]

   -static_library("dtls") {
   +#static_library("dtls") {
   +source_set("dtls") {
            cflags = dtls_cflags
            defines = dtls_def
            sources = dtls_src
参考如下代码段修改 third_party/iot_link/network/dtls/mbedtls/mbedtls_port/dtls_interface.c
   diff --git a/third_party/iot_link/network/dtls/mbedtls/mbedtls_port/dtls_interface.c b/third_party/iot_link/network/dtls/mbedtls/mbedtls_port/dtls_interface.c
   index 9f87c6fae041b17af4522d5d89114b69005a00be..73e406893a33385a9888a82cf6d1b3706a81387d 100755
   --- a/third_party/iot_link/network/dtls/mbedtls/mbedtls_port/dtls_interface.c
   +++ b/third_party/iot_link/network/dtls/mbedtls/mbedtls_port/dtls_interface.c
   @@ -56,6 +56,7 @@
    #include "dtls_interface.h"
    #include "mbedtls/net_sockets.h"
    #include "mbedtls/ssl_internal.h"
   +#include "mbedtls/platform.h"
    #include "cmsis_os2.h"
    #include "string.h"

   @@ -157,6 +158,7 @@ mbedtls_ssl_context *dtls_ssl_new(dtls_establish_info_s *info, char plat_type)
    #if defined(MBEDTLS_KEY_EXCHANGE__SOME__PSK_ENABLED)
        if (info->psk_or_cert == VERIFY_WITH_PSK)
        {
   +	  #if 0
            if ((ret = mbedtls_ssl_conf_psk(conf,
                                            info->v.p.psk,
                                            info->v.p.psk_len,
   @@ -166,6 +168,7 @@ mbedtls_ssl_context *dtls_ssl_new(dtls_establish_info_s *info, char plat_type)
                MBEDTLS_LOG("mbedtls_ssl_conf_psk failed: -0x%x", -ret);
                goto exit_fail;
            }
   +		#endif
        }
    #endif

   @@ -548,5 +551,5 @@ void dtls_init(void)
    {
        (void)mbedtls_platform_set_calloc_free(calloc, free);
        (void)mbedtls_platform_set_snprintf(snprintf);
   -    (void)mbedtls_platform_set_printf(printf);
   +    //(void)mbedtls_platform_set_printf(printf);
    }
参考如下代码段修改 third_party/iot_link/network/mqtt/BUILD.gn
   diff --git a/third_party/iot_link/network/mqtt/BUILD.gn b/third_party/iot_link/network/mqtt/BUILD.gn
   index 5a4a8e0ded129b91ce550a5d16f04e0784fddd45..d6bc39b8ede5735d79c74a6ab562c6141bd0b377 100755
   --- a/third_party/iot_link/network/mqtt/BUILD.gn
   +++ b/third_party/iot_link/network/mqtt/BUILD.gn
   @@ -16,6 +16,7 @@ mqtt_paho_inc = [
        "paho_mqtt/paho/MQTTPacket/src",
        "paho_mqtt/port",
        "../../inc",
   +    "//third_party/musl/porting/liteos_m/kernel/include/",
        "//kernel/liteos_m/components/cmsis/2.0",
        "//vendor/hisi/hi3861/hi3861/third_party/lwip_sack/include/",
    ]
   @@ -50,7 +51,8 @@ mqtt_cflags = [
        "-Wno-unused-function",
    ]

   -static_library("mqtt") {
   +#static_library("mqtt") {
   +source_set("mqtt") {
            cflags = mqtt_cflags
            defines = mqtt_paho_defs
            sources = mqtt_paho_src
参考如下代码段修改 third_party/iot_link/network/mqtt/paho_mqtt/port/paho_mqtt_port.c
   diff --git a/third_party/iot_link/network/mqtt/paho_mqtt/port/paho_mqtt_port.c b/third_party/iot_link/network/mqtt/paho_mqtt/port/paho_mqtt_port.c
   index a213b74c7286c68061e3285c0c3ac6c440949f26..d0900c8d88149f08c93fe885f34f4d2affa30885 100755
   --- a/third_party/iot_link/network/mqtt/paho_mqtt/port/paho_mqtt_port.c
   +++ b/third_party/iot_link/network/mqtt/paho_mqtt/port/paho_mqtt_port.c
   @@ -180,6 +180,50 @@ static int __socket_read(void *ctx, unsigned char *buf, int len, int timeout)
        int fd;
        int ret = 0;

   +#if 1
   +        int bytes = 0;
   +    fd_set fdset;
   +
   +    struct timeval timedelay = {timeout / 1000, (timeout % 1000) * 1000};
   +    if(NULL== buf)
   +    {
   +        return ret;
   +    }
   +
   +    fd = (int)(intptr_t)ctx;  ///< socket could be zero
   +
   +    if (timedelay.tv_sec < 0 || (timedelay.tv_sec == 0 && timedelay.tv_usec <= 0))
   +    {
   +        timedelay.tv_sec = 0;
   +        timedelay.tv_usec = 100;
   +    }
   +    timedelay.tv_sec = 5;
   +    FD_ZERO(&fdset);
   +    FD_SET(fd, &fdset);
   +
   +    ret = select(fd + 1, &fdset, NULL, NULL, &timedelay);
   +    printf("[%s|%s|%d]fd = %d, ret = %d\n", __FILE__,__func__,__LINE__, fd, ret);
   +    if (ret > 0) {
   +        while (bytes < len) {
   +            int rc = recv(fd, &buf[bytes], (size_t)(len - bytes), 0);
   +            printf("[%s|%s|%d]fd = %d, rc = %d\n", __FILE__,__func__,__LINE__, fd, rc);
   +            if (rc == -1) {
   +                if (errno != EAGAIN && errno != EWOULDBLOCK) {
   +                    bytes = -1;
   +                }
   +                break;
   +            } else if (rc == 0) {
   +                bytes = 0;
   +                break;
   +            } else {
   +                bytes += rc;
   +            }
   +        }
   +   }
   +
   +   return bytes;
   +#else
   +
        struct timeval timedelay = {timeout / 1000, (timeout % 1000) * 1000};
        if(NULL== buf)
        {
   @@ -216,7 +260,7 @@ static int __socket_read(void *ctx, unsigned char *buf, int len, int timeout)
            }
        }
        return bytes;
   -
   +  #endif
    }


   @@ -586,7 +630,7 @@ static void * __connect(mqtt_al_conpara_t *conparam)
        attr.cb_mem = NULL;
        attr.cb_size = 0U;
        attr.stack_mem = NULL;
   -    attr.stack_size = 1024 * 2;
   +    attr.stack_size = 1024 * 4;
        attr.priority = 28;
        cb->task = osThreadNew((osThreadFunc_t)__loop_entry, cb, &attr);
        if(NULL == cb->task)
参考如下代码段修改 third_party/iot_link/network/mqtt/paho_mqtt/port/paho_osdepends.h
   diff --git a/third_party/iot_link/network/mqtt/paho_mqtt/port/paho_osdepends.h b/third_party/iot_link/network/mqtt/paho_mqtt/port/paho_osdepends.h
   index 2c6cab1b90bef7be82891637c200cdb664e9735b..38e3dce3867d2b2d538858c72b36bee7330c7b4f 100755
   --- a/third_party/iot_link/network/mqtt/paho_mqtt/port/paho_osdepends.h
   +++ b/third_party/iot_link/network/mqtt/paho_mqtt/port/paho_osdepends.h
   @@ -84,6 +84,7 @@

    #include "ohos_init.h"
    #include "cmsis_os2.h"
   +#include "sys/time.h"
    #include  <mqtt_al.h>

    #define MQTT_TASK 1
   @@ -117,6 +118,13 @@ typedef struct Thread
    int ThreadStart(Thread*, void (*fn)(void*), void* arg);


   +#define timeradd(s,t,a) (void) ( (a)->tv_sec = (s)->tv_sec + (t)->tv_sec, \
   +        ((a)->tv_usec = (s)->tv_usec + (t)->tv_usec) >= 1000000 && \
   +        ((a)->tv_usec -= 1000000, (a)->tv_sec++) )
   +#define timersub(s,t,a) (void) ( (a)->tv_sec = (s)->tv_sec - (t)->tv_sec, \
   +        ((a)->tv_usec = (s)->tv_usec - (t)->tv_usec) < 0 && \
   +        ((a)->tv_usec += 1000000, (a)->tv_sec--) )
   +
    typedef struct Network
    {
        void *ctx;                      ///< if it is tls, then it is tls context, else it is socket fd
参考如下代码段修改 third_party/iot_link/oc_mqtt/BUILD.gn
   diff --git a/third_party/iot_link/oc_mqtt/BUILD.gn b/third_party/iot_link/oc_mqtt/BUILD.gn
   index c777c5e4f2e79646a5c76471f22c5437e9d4b3ee..1e3e07ddb6c0bc52465a60c415c8550608a21e55 100755
   --- a/third_party/iot_link/oc_mqtt/BUILD.gn
   +++ b/third_party/iot_link/oc_mqtt/BUILD.gn
   @@ -11,7 +11,8 @@
    # See the License for the specific language governing permissions and
    # limitations under the License.

   -static_library("oc_mqtt") {
   +#static_library("oc_mqtt") {
   +source_set("oc_mqtt") {
        sources = [
            "oc_mqtt_al/oc_mqtt_al.c",
            "oc_mqtt_profile_v5/oc_mqtt_profile.c",
- ###### communicationkit相关修改
参考下方代码修改foundation/ace/ace_engine_lite/frameworks/module_manager/ohos_module_config.h
   diff --git a/frameworks/module_manager/ohos_module_config.h b/frameworks/module_manager/ohos_module_config.h
   index f8eb744..3bb25d1 100644
   --- a/frameworks/module_manager/ohos_module_config.h
   +++ b/frameworks/module_manager/ohos_module_config.h
   @@ -47,6 +47,10 @@ extern void InitNativeApiFs(JSIValue exports);
    extern void InitNativeApiKv(JSIValue exports);
    #endif

   +#if (FEATURE_MODULE_COMMUNICATIONKIT == 1)
   +extern void InitNativeApiCommunicationKit(JSIValue exports);
   +#endif
   +
    #if (FEATURE_MODULE_DEVICE == 1)
    extern void InitDeviceModule(JSIValue exports);
    #endif
   @@ -98,11 +102,13 @@ const Module OHOS_MODULES[] = {
    #if (FEATURE_MODULE_DIALOG == 1)
        {"prompt", InitDialogModule},
    #endif // FEATURE_MODULE_DIALOG
   -
    #if (FEATURE_MODULE_STORAGE == 1)
        {"file", InitNativeApiFs},
        {"storage", InitNativeApiKv},
    #endif
   +#if (FEATURE_MODULE_COMMUNICATIONKIT == 1)
   +    {"CommunicationKit", InitNativeApiCommunicationKit},
   +#endif
    #if (FEATURE_MODULE_DEVICE == 1)
        {"device", InitDeviceModule},
    #endif
- ###### flash_size配置修改
根据开发板的硬件版本不同,还需更改配置文件中flash_size的值。具体路径为/device/board/fnlink/v200zr/liteos_m/config.gni。其中v1.0版本对应16,2.0版本对应32,硬件版本打印在了开发板正面。
   diff --git a/v200zr/liteos_m/config.gni b/v200zr/liteos_m/config.gni
   index b288101..6489dd2 100644
   --- a/v200zr/liteos_m/config.gni
   +++ b/v200zr/liteos_m/config.gni
   @@ -47,7 +47,7 @@ if (product_path != "") {
      bsp_bin_list = product_conf.bsp_bin_list
      pack_burn = product_conf.pack_burn
    }
   -flash_size = 16
   +flash_size = 32
- ###### hdf配置文件修改
参考下方代码修改device/board/fnlink/shields/v200zr-evb-t1/v200zr-evb-t1.hcs
   diff --git a/shields/v200zr-evb-t1/v200zr-evb-t1.hcs b/shields/v200zr-evb-t1/v200zr-evb-t1.hcs
   index 44212eb..4fc99da 100644
   --- a/shields/v200zr-evb-t1/v200zr-evb-t1.hcs
   +++ b/shields/v200zr-evb-t1/v200zr-evb-t1.hcs
   @@ -17,12 +17,17 @@ root {
        platform {
            gpio_config {
                match_attr = "gpio_config";
   -            pin = [0, 1];
   +            pin = [0, 1, 2, 3, 4, 5, 6, 7];
                // touch_ztw523: TSP_RST - GPIO12, TSP_INT-GPIO27
                // touch_fts: TSP_RST - GPIO05, TSP_INT-GPIO27
   -            realPin = [5, 27];
   -            config = [5, 2];
   -            pinNum = 2;
   +            realPin = [5, 27, 1, 11, 15, 10, 14, 13];
   +            config = [5, 2, 2, 4, 5, 5, 5, 2];
   +            pinNum = 8;
   +        }
   +        pwm0_config{
   +            match_attr = "pwm0_config";
   +            pwmId = 0;
   +            pwmPin = 20;
            }
            i2c_config {
                i2c0 {
gpio hdf框架相关修改。
根据下方代码修改drivers/adapter/platform/gpio/gpio_bes.c
diff --git a/platform/gpio/gpio_bes.c b/platform/gpio/gpio_bes.c
index ed4d18b..890d528 100755
--- a/platform/gpio/gpio_bes.c
+++ b/platform/gpio/gpio_bes.c
@@ -257,7 +257,7 @@ static int32_t GpioDriverBind(struct HdfDeviceObject *device)
     }

     gpioCntlr.device.hdfDev = device;
-    device->service = gpioCntlr.device.service;
+    device->service = &(gpioCntlr.device);

     return HDF_SUCCESS;
 }
将pwm_if.c纳入编译。
参考下方代码修改drivers\adapter\khdf\liteos_m\platform\BUILD.gn
diff --git a/khdf/liteos_m/platform/BUILD.gn b/khdf/liteos_m/platform/BUILD.gn
index 84c9152..8a4016a 100755
--- a/khdf/liteos_m/platform/BUILD.gn
+++ b/khdf/liteos_m/platform/BUILD.gn
@@ -63,7 +63,10 @@ hdf_driver("hdf_platform_lite") {
   }

   if (defined(LOSCFG_DRIVERS_HDF_PLATFORM_PWM)) {
-    sources += [ "$HDF_FRAMEWORKS_PATH/support/platform/src/pwm/pwm_core.c" ]
+    sources += [
+      "$HDF_FRAMEWORKS_PATH/support/platform/src/pwm/pwm_core.c",
+      "$HDF_FRAMEWORKS_PATH/support/platform/src/pwm/pwm_if.c",
+    ]
   }

   if (defined(LOSCFG_DRIVERS_HDF_PLATFORM_RTC)) {
将JS应用合入工程。
关于JS应用开发请参考从零开始学习L0: JS开发系列。本节为可选章节,忽略本节内容不影响智能门铃项目的展示和运行。但若想要在本项目的基础上进行涉及到显示的内容修改与新规开发,例如增加天气预报的图标,则需完整的阅读本节及链接内容。
1.下载并安装DevEco Studio。
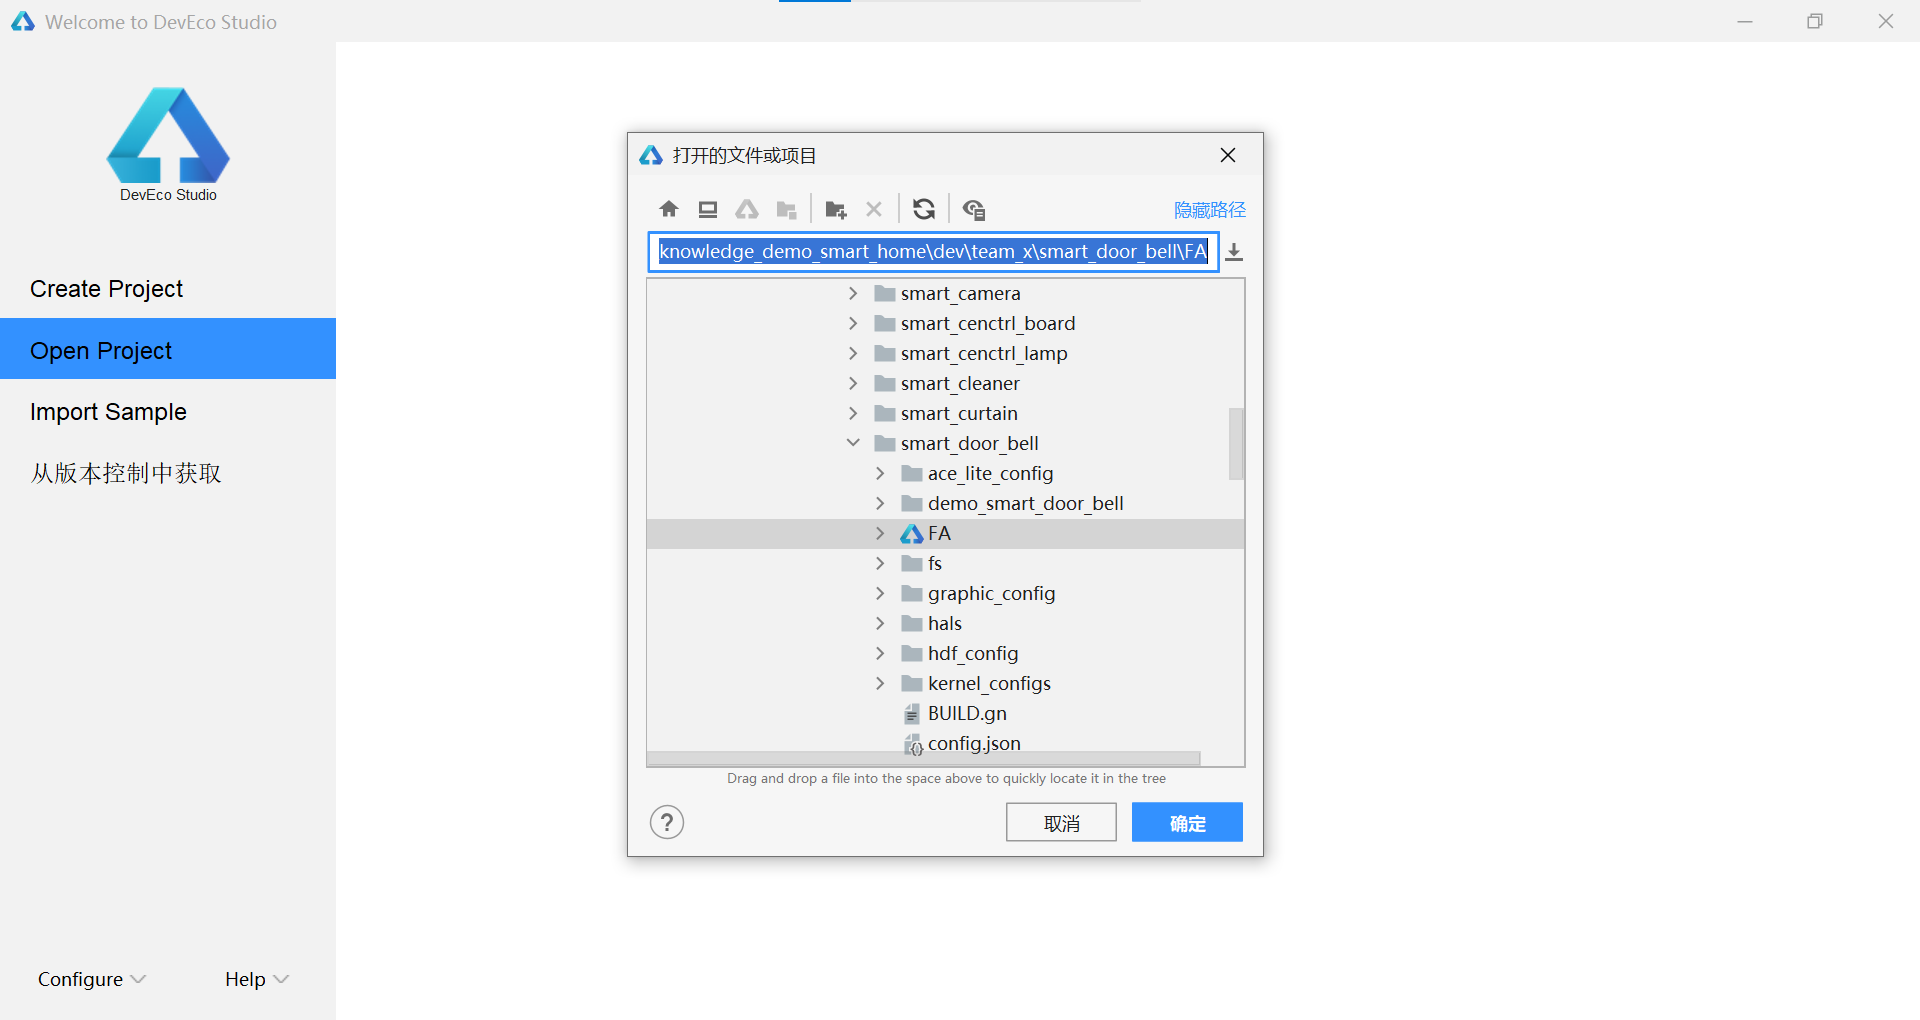
2.打开js工程。
工程目录为:knowledge_demo_smart_home/dev/team_x/smart_door_bell/FA
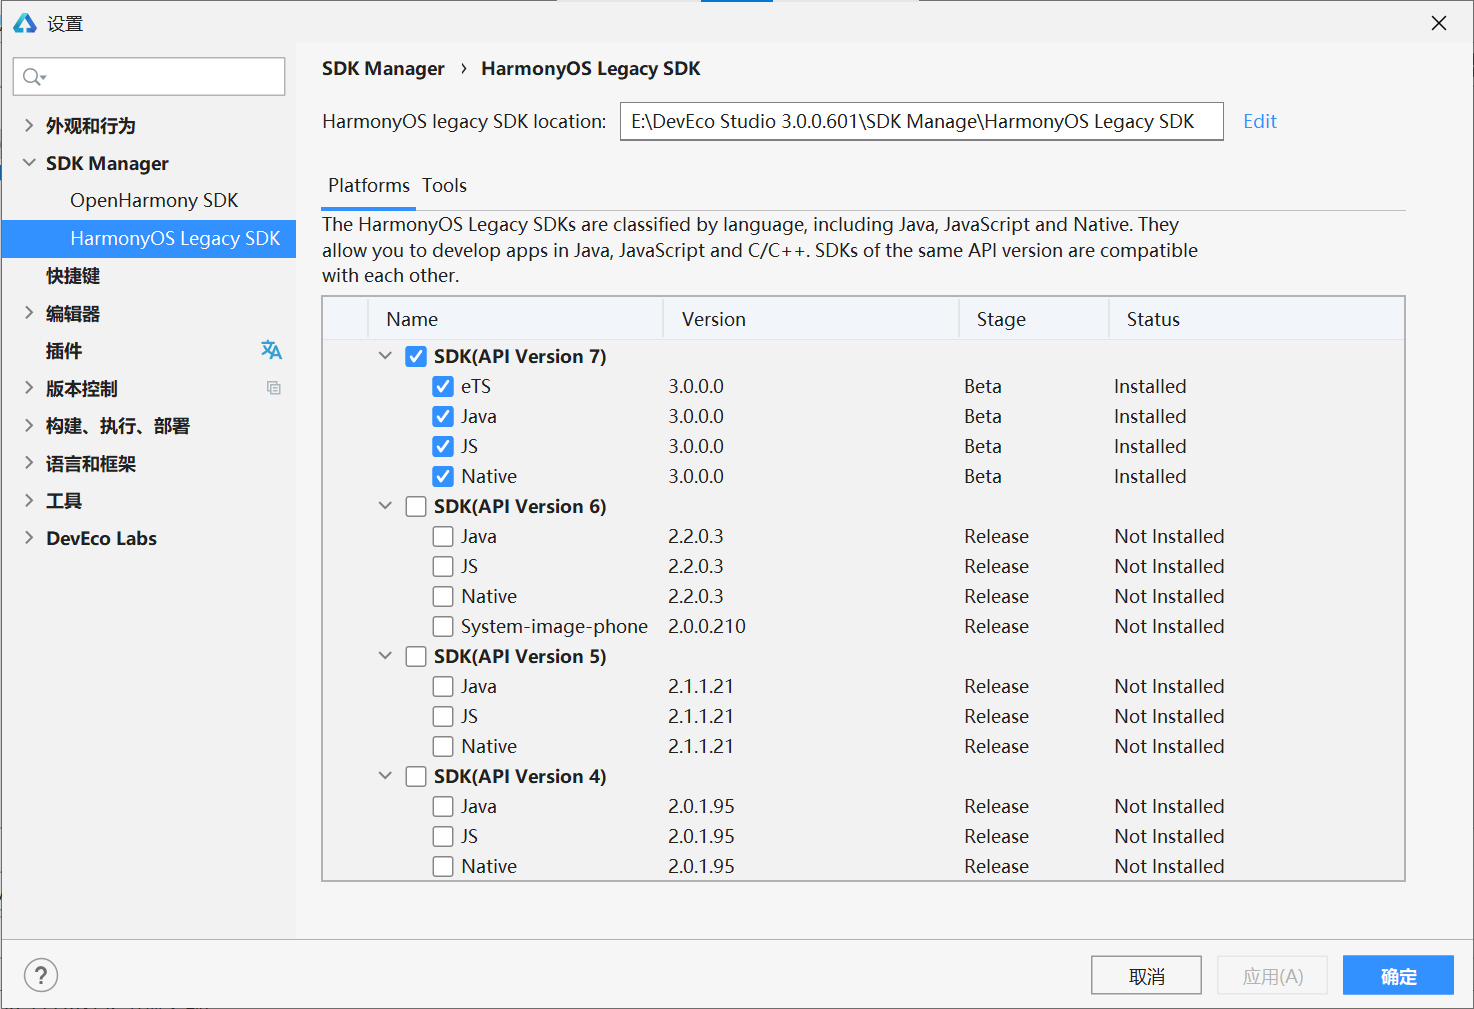
3.在DevEco Studio的SDK中添加@system.communicationkit.d.ts文件。
将@system.communicationkit.d.ts文件(源文件目录:~/knowledge_demo_smart_home/dev/interface/sdk-js/api/common/@system.communicationkit.d.ts)拷贝到在DevEco Studio的SDK中(目标目录:HarmonyOS Legacy SDK/js/3.0.0.0/api/common)。*HarmonyOS Legacy SDK*目录在DevEco Studio安装时,由用户配置,该目录位置可在设置(ctrl+alt+s)中查找。
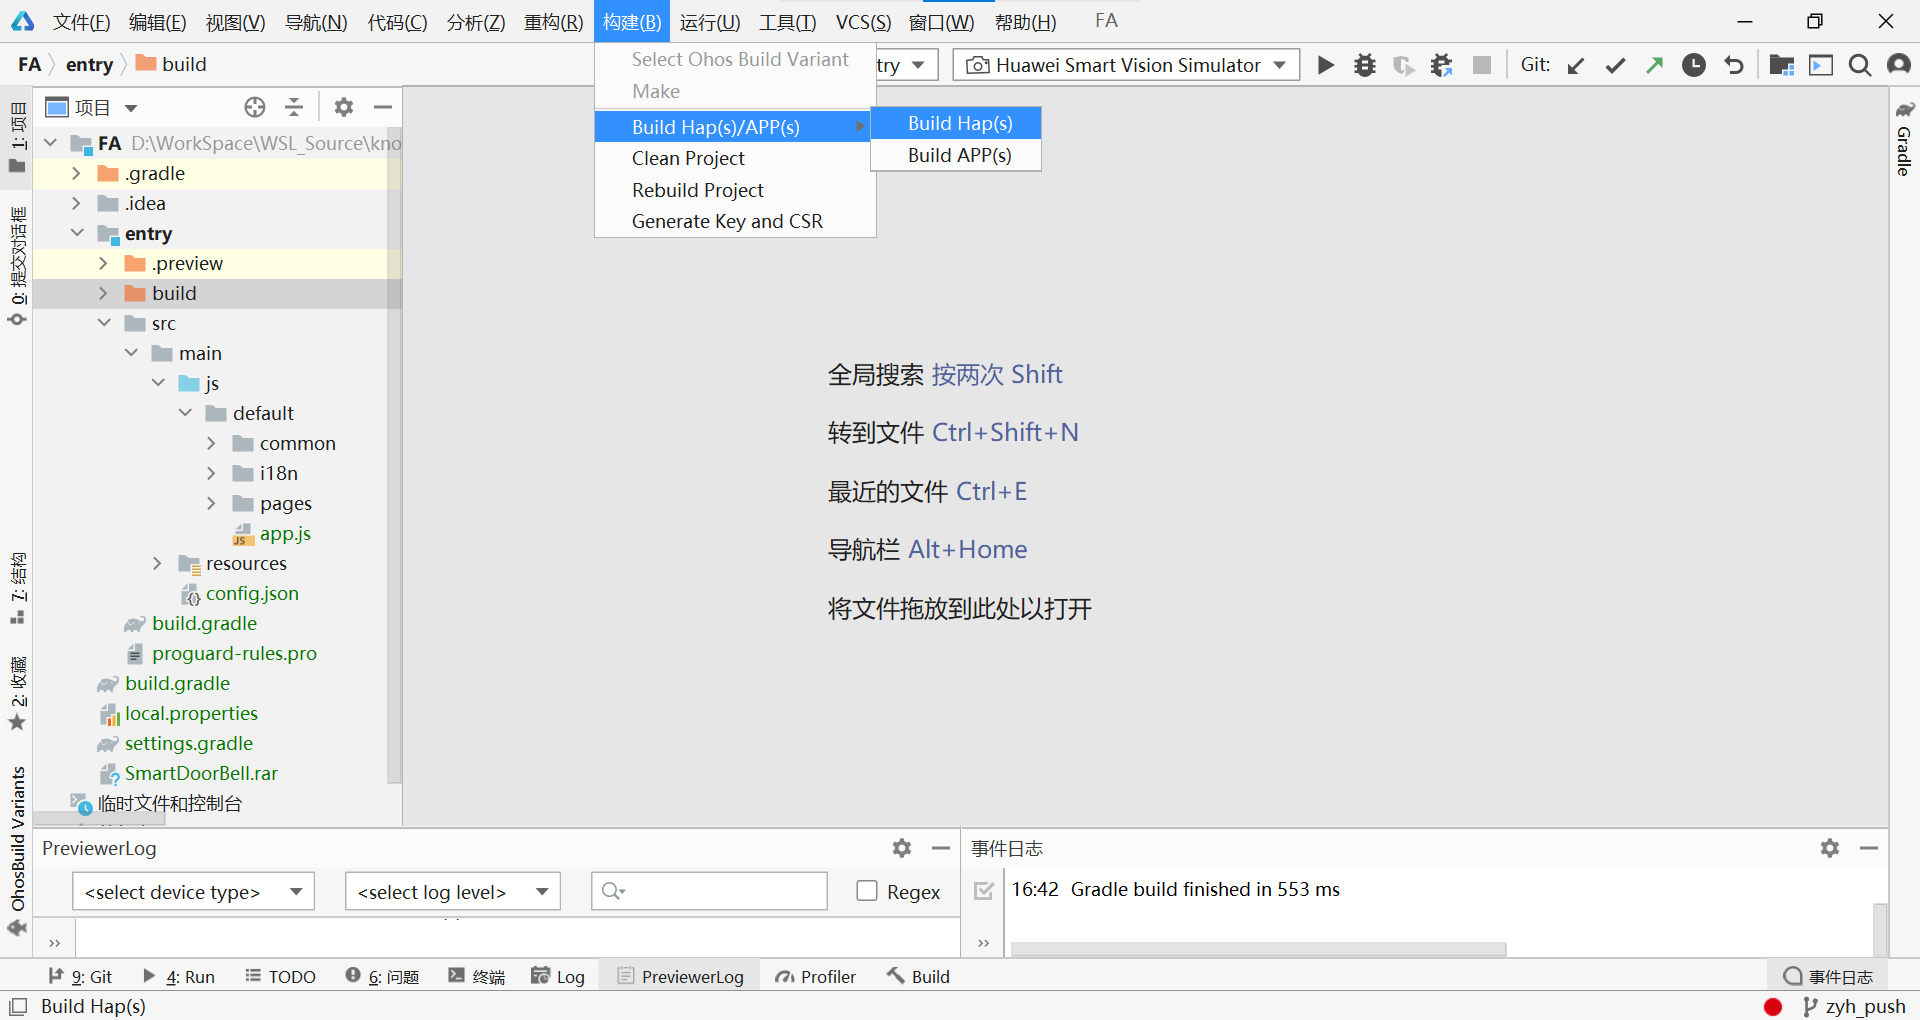
4.编译hap包。
依次选择构建 -> Build Hap(s)/APP(s) -> Build Hap(s)进行hap包编译,编译后的hap包目录为:FA\entry\build\outputs\hap\debug\entry-debug-lite-unsigned.hap。
5.将js代码合入OpenHarmonySDK。
将entry-debug-lite-unsigned.hap修改后缀为zip并解压。在解压后的目录:entry-debug-lite-unsigned/assets/js/default目录中除app.js.map外的的数据全部拷贝到OpenHarmonySDK中的vendor/team_x/smart_door_bell/fs/data/data/js目录下。
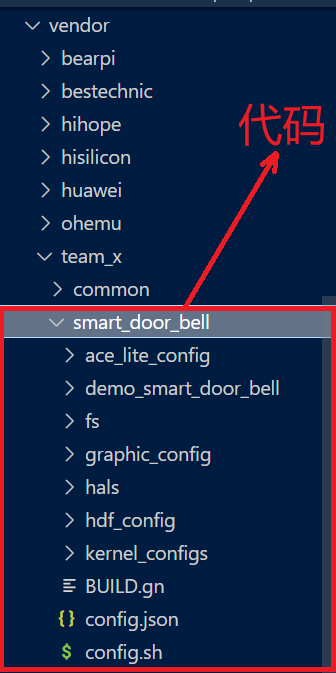
- ###### 代码目录结构
整合并修改完成后的代码目录结构如下图:
5、编译&烧录
固件编译
编译命令:
hb set // 如果是第一次编译,Input code path 命令行中键入"./" 指定OpenHarmony工程编译根目录后回车。

如下图所示,使用键盘上下键选中智能门铃 “smart_door_bell”(注:工程名字根据实际要编译的工程来):
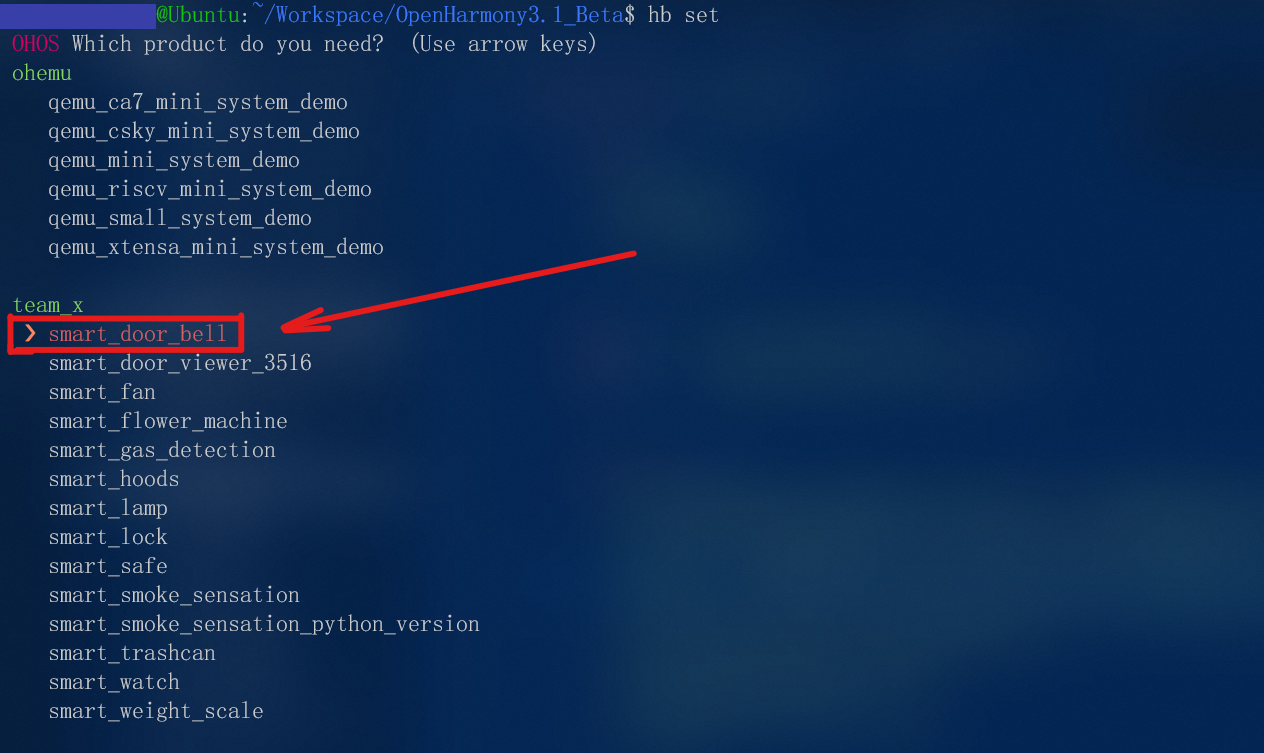
hb build // 如果需要全量编译,可以添加-f 选项
编译通过,生成固件成功,如图:

固件烧录步骤
1.安装CP2102驱动
2.固件编译完成以后拷贝/out/v200zr/smart_door_bell/write_flash_gui文件夹到windows下,并点击Wifi_download_main.exe
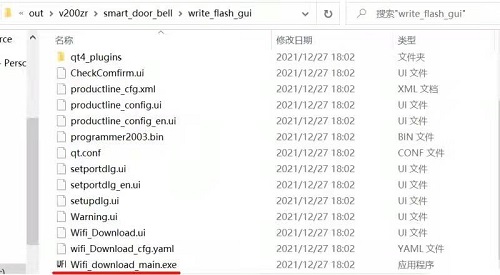
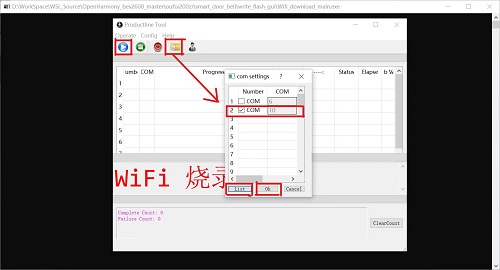
3.点击工具上的文件夹图标
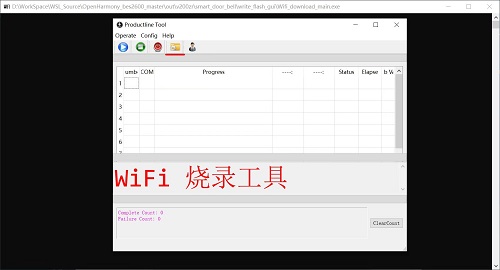
4.选择List按钮
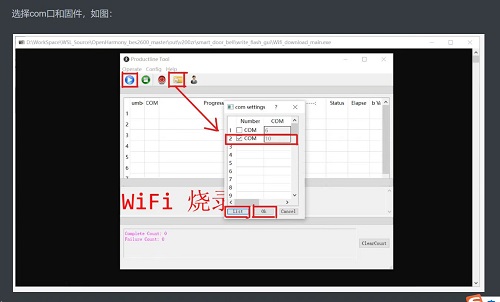
5.在显示出来的串口列表中选择需要烧录的串口,并点击开始按钮。
6.在开发板上点击reset按键,或者重新上电。
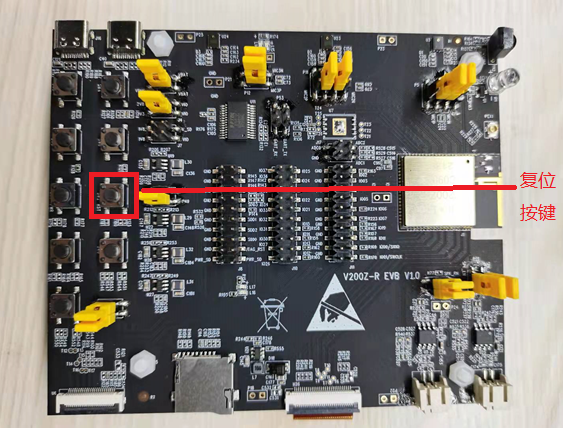
7.进入烧录状态
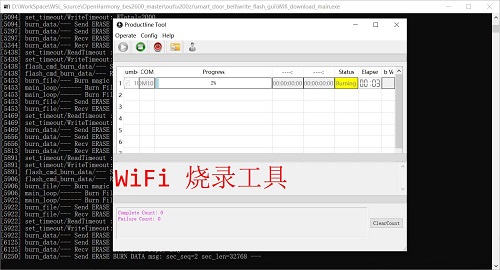
8.烧录成功
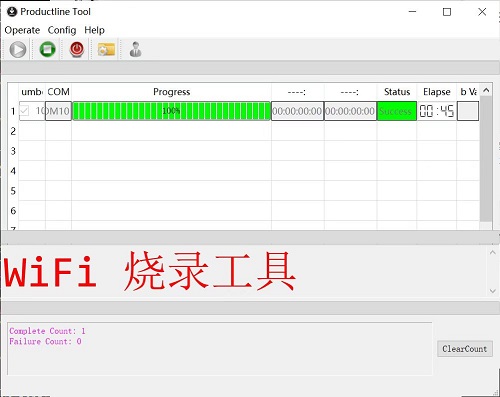
注意:固件烧录完成后需将烧录窗口关闭,再按下设备Reset键设备才能启动。如果未将烧录窗口关闭,设备会再次进行烧写状态。
6、设备配网
在设备上电前需准备好安装了数字管家应用的HarmonyOS手机,详情见数字管家应用开发, 并在设置中开启手机的NFC功能;
写设备NFC标签,详细操作见设备NFC标签指导文档;
烧录完成后,上电。开发者在观察开发板上状态LED灯以1Hz的频率闪烁时,将手机上半部靠近开发板NFC标签处;
手机将自动拉起数字管家应用并进入配网状态,根据手机提示连接到设备热点teamX-DoorBell01后返回数字管家APP,输入路由账号密码,点击确定后,手机将信息传输到设备侧,设备开始联网。